
Instagram is one of the most popular social media platforms today. Its latest and most captivating feature reels has made it pretty famous among users. More and more people are now using this feature for promoting their products or their unique abilities.
Read this post, if you are wondering how to upload high quality reels on Instagram. This step by step guide explains everything that you need to know to upload HD visual content on Instagram.
Keep reading….
Why Instagram Doesn’t Support 4K Reels | Understand Instagram’s Reels Compression & Limitations
Instagram does not natively support 4K Reels. This platform is optimized for 1080p resolution. So, even if you upload a 4K video Instagram will always downscale them to 1080p.
This leads to a significant reduction in detail and quality. Next side, 1080p enables Instagram to deliver videos efficiently to a wider range of devices and users. Users with poor internet connections can also have access to those visual contents.
Let’s now understand Instagram’s Reels compression and limitations in detail.
Here we go…
Instagram’s Compression and Limitations
- Data Compression: Videos are compressed to 1080p by Instagram regardless of their actual resolution. This, however negatively impacts the quality of the video and affects your online visibility.
- Data Consumption: 4K Reels are heavier in size. These require significantly more data to upload and stream which ultimately impacts user experience.
- Storage and Processing: Storing and processing 4K Reels require substantial infrastructure. This can ultimately add to platform’s cost which is not wise at all.
- Internet and Device Compatibility: Playing 4K Reels needs fast internet and the right devices. Not everyone has that, so 1080p is a better option. It’s easier to load, works on most devices and still looks great for your content.
Now learn the best Instagram Reels settings and what are these settings role for maintaining reel quality in simple words.
Here we go…
Step by Step Guide to Upload High Quality Reels on Instagram
Here are the steps you can follow to upload superior quality content on Instagram. Take a look…
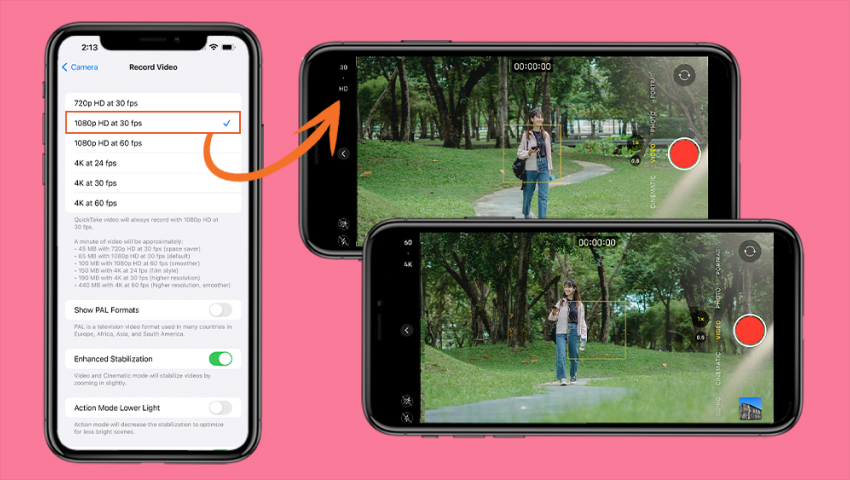
Step 1: Record in the Best Video Settings
Recording is the first and primary step to ensure high quality Instagram reels. To begin with ensure that you record your videos using the optimal video settings. Here is what you need:
Instruments Required for the Best Video Recording
For recording the best video, you need:
- A smartphone with a good camera (preferably iPhone) or a GoPro for recording high quality videos.
- A tripod for recording stable video
- An external microphone like Lavalier (clip on) microphone or Shotgun microphone for clear audio
- Good lighting for clear and engaging content.
- Video editing apps like CapCut, Inshot or Canva to enhance your creating Reels content after recording.
What is the Right Resolution & Why It Matters?
For high quality you should upload reels in 1080p. Instagram does not support 4K videos because 4K videos require more data to upload and stream and this negatively impacts users with poor Internet connection.
What is the Frame Rate?
Frame rate is the number of images shown per second in a video. For Instagram Reels 30fps and 60fps are common but 30fps is recommended. It gives good quality and helps avoid extra compression. 60fps can be used for filming if you wish to slow down footage in post production. However, exporting at 60fps can impact the quality and details.
What is Bitrate & Why Is It Important?
Bitrate refers to the number of bits (the amount of data) used to transmit, encode audio and video content. It plays a crucial role when it comes to uploading HD quality content on Instagram. It balances both quality and file size. More bitrate simply equates to better quality content.
What is HDR & Why Should It Be Used?
HDR is a technology that enhances image quality. It basically expands the range of colors and brightness leading to more vibrant and lifelike content. If you really wish to have compatible content then using HDR is a MUST. It provides a more engaging and aesthetically pleasing experience.
What is ISO & How Does It Affect Video Quality?
ISO controls camera’s sensitivity to light. For high quality Instagram Reels using the right ISO is key. Low ISO gives clear and sharp videos while high ISO adds more light but can make videos look grainy. Aim for the lowest ISO possible in good lighting.
What is Shutter Speed & How Does It Affect Motion?
Shutter speed is the time camera’s shutter remains open allowing light to reach the sensor. It directly impacts the way motion is captured in a photograph. Faster speeds such as 1/1000, 1/500 and 1/250 effectively freeze motion whereas slower speeds like 1/60, 1/30, 1/15 and 1 second, result in motion blur.
The 2x rule, also known as the 180 degree shutter rule is considered ideal for smooth motion in video. This means that your shutter speed should be approximately double your frame rate for high quality video content.
Best Settings for 4K Video Recording
You are advised to record a 4K video at 60fps if support otherwise 30fps (may be video lag) and a bitrate of 12,000 kbps to achieve the highest quality content. Also, make sure to have an aspect ratio of 9:16 for vertical content. But
Best Settings for 1080p Video Recording
You can try recording a 4K (3840×2160) video for your Instagram visual content. However, it is crucial to compress it to 1080p (1920×1080) before uploading. Additionally, the video can be recorded at 30fps in MP4 format and aim for a bitrate of 10,000 to 15,000 kbps.
Pro Tip: You can record 4K videos at 60FPS and 1080p videos at 60FPS.
Additional requirements:
- Frame Rate: 60fps
- File Format: Use MOV or MP4 format
- Codec: H.264.
- Bitrate: Aim for 20,000 kbps and above for 4K.
- Audio Settings: AAC, 128 kbps or higher, 44.1 kHz
- HDR: Consider disabling HDR mode as it can impact the brightness.
- Lighting: Record your videos in the well lit or natural environment for clear and vibrant footage.
Also Read: Best AI Video Generator
Step 2: Edit Using the Best Apps for High Quality Reels
Once you have recorded your videos, it is crucial to edit it using the best tools. Read ahead for the list of tools.
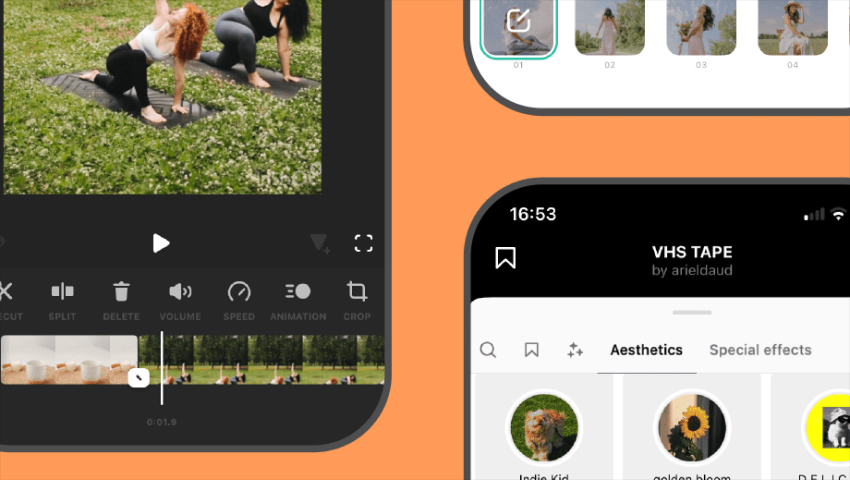
List of Best Video Editing Apps
- CapCut: CapCut is an excellent tool for editing your videos prior to uploading them to Instagram. It includes a wide range of editing tools like special effects, transitions and text overlays.
- VN Video Editor: It’s a versatile tool for aspect ratio adjustment, video cropping, background adjustments, filters and transition effects.
- InShot: InShot is a great tool for trimming, merging and adding music and effects to your video content.
- Splice: It provides advanced features like multi layer editing and cinematic effects. It is ideal for professional videos.
- Canva: A popular tool for creating visually appealing Reels with templates and graphics.
All of these apps offer impressive features that can help you enhance your video quality. Aside from that you can use the builtin Insta’s editor.
What is Color Grading & Why It’s Important for Reels?
Color grading is the process of adjusting and enhancing the colors in your video. It helps set the mood, highlight important parts and improve the overall look. Color grading makes your Reels more eye catching and engaging.
What is Stabilization & When Should It Be Used?
Stabilization helps reduce camera shake while keeping video quality high. It’s great for recording while moving, running and recording cinematic shots. This make content more enjoyable to watch.
Pro Tip:
Choosing the best app to make reels may seem like a task. But worry not! If you are a beginner and wish to upload reels in high quality use CapCut or VN Video Editor. These are the two most user friendly applications that are considered ideal for beginners. You can make your videos aesthetically pleasing using these tools that too without much effort.
Step 3: Export with the Best Settings for Instagram Reels
Only recording high quality videos and editing them is not enough to enhance your visibility on Instagram. You also need to use the right export settings for Instagram reels some of which are outlined here:
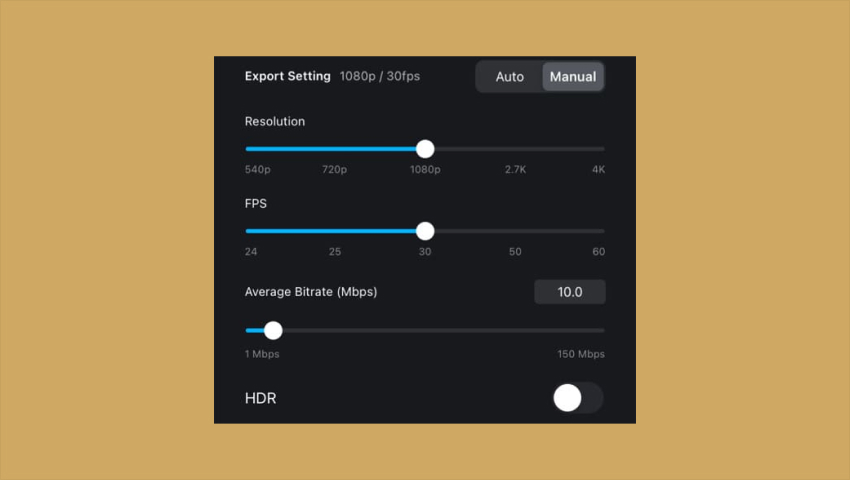
Export Settings for Instagram Reels
- Aspect Ratio: Use an Aspect Ratio of 9:16. This enhances watchability for all devices including hand held devices.
- File Format: MP4 is considered as it is universally acknowledged file format for high quality video content.
- Bitrate: Export your videos in 10 to 15 Mbps (or 10,000 – 15,000 kbps) for 1080p and 20+ Mbps for 4K.
- Audio Format: The best audio format is AAC 48kHz as it helps have optimal audio quality.
How to Minimize File Size Without Losing Quality?
To minimize file size you are advised to use the H.264 or H.265 video codec. It is an Instagram supported encoder that reduces further compression layers. Instagram supports images and videos between 320p and 1080p resolution.
However, for 4K videos you are advised to use either H.264 or H.265 video codec. H.265 is the successor to H.264. It offers more efficient compression than its predecessor.
As you know, Instagram does not natively support high resolution videos such as 4K. Hence, you need to minimize the size of the video before uploading the content on Instagram.
Best Export Settings for Instagram Reels
- Size & Aspect Ratio: 9:16.
- Dimensions: 1080 pixels x 1920 pixels.
- Duration: Up to 90 seconds
- Resolution: 1080p.
- Caption: Up to 2.2K characters long
- Cover Photo: 9:16 along with 1080 pixels x 1920 pixels.
Also Read: Montage Videos Views Stuck
Step 4: Adjust Instagram Settings & Internet Before Uploading
Another important thing that you need to keep in mind is to adjust Instagram settings and the Internet. Doing so ensures you upload HD reels on Instagram. Here are a few tricks..
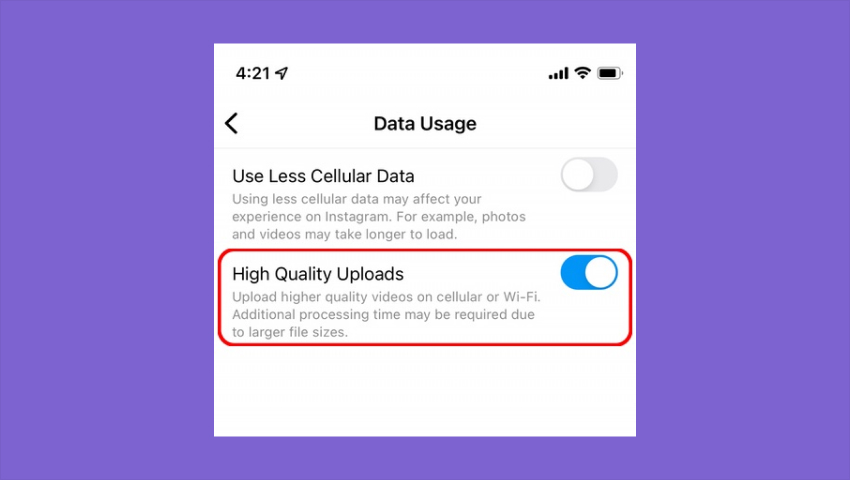
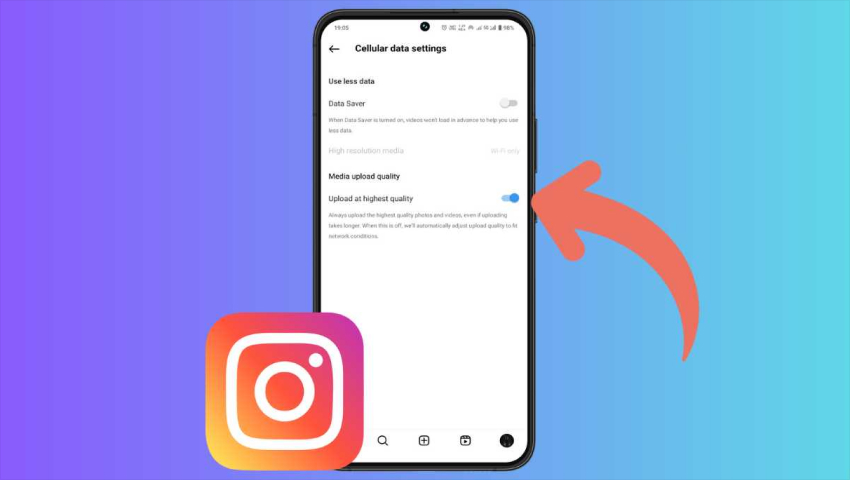
i. Enable High Quality Uploads in Instagram
First things first, enable high quality uploads on Instagram. Follow these steps:
- Step 1: Go to your Instagram profile
- Step 2: Click on the three lines in the top right
- Step 3: Select Settings and Privacy
- Step 4: Go to Data Usage and Media Quality
- Step 5: Last, hit Upload at highest quality
ii. Disable Data Saver Mode
Make sure to disable data saver mode prior. This is to ensure you upload the highest quality content and any issues with the upload process. Here is how to disable Data Saver Mode:
- Step 1: Open your Instagram profile
- Step 2: Click on the menu icon
- Step 3: Go to Settings
- Step 4: Then click on Account
- Step 5: Turn off Use Less Data or Data Saver
iii. Compress Your Video To 1080p Before Uploading It
It is crucial to compress your video to 1080p before you upload it. This is because Instagram natively supports this resolution.
iv. Make sure you have a robust internet connection
Having a robust internet connection is a MUST for fast upload across multiple devices.
Why Instagram’s Auto Compression Lowers Quality?
“According to Instagram all bigger size videos (especially 4k videos) are auto compressed to reduce file size and bandwidth usage. This enables users to access Insta reels across multiple devices despite poor internet connectivity“
However, auto compression significantly impacts the quality of the content. To avoid this, you are advised to upload your reels in 1080p even if you record a 4K video downscale it before uploading it to minimize the negative impact of auto compression.
What is the Best Internet Speed for Uploading?
You need a minimum of 10 Mbps speed to upload high quality HD Instagram reels and use faster Internet speed which help to upload high quality videos even on mobiles. Faster Internet speed will make the process of uploading a breeze for you.
Which One to Use Mobile Data or WiFI?
You can undoubtedly upload using your Mobile data. However, it is better to have 5G WiFi routers connectivity for quicker uploads.
Know that uploading via mobile data may lead to more compression which can impact your content visual quality. It is recommended that you upload reels while connected to a strong WiFi network to ensure quality uploads.
Step 5: Upload Without Losing Quality
Once you have taken all 4 steps, it’s now time for uploading. However, it is crucial to ensure you do it without losing its quality. So, how to do it?
Here are a few things that you can do to upload reels in high quality. take a look…
- Upload videos in 1080p
- Check your videos on different devices prior to uploading it.
- If everything seems perfect, it’s time to upload!
Why Instagram Compresses Videos?
Instagram compresses video so every type of users experience smooth and good viewing experience. Compressing video ensures fast and smooth steaming for even those who have poor internet connectivity. To avoid auto compression upload video in 1080p even if you record your video in 4K downscale it to 1080p for quality upload.
Why Is Checking Your Video on Different Devices Important?
Instagram’s compression and display settings can look different on various devices sometimes causing quality loss and cropping. Always preview your video on different screens before uploading. This helps you spot and fix any issues ensuring a better and more consistent viewer experience.
Now, let’s look at the best practices to maintain visual post quality across all devices.
Tips & Best Practices to Maintain Reel Quality
- Upload 90 second Reels to attract viewers’ attention.
- Make sure the first 3 seconds of the video are the most captivating as it helps capture viewers attention.
- Focus on creating original content.
- Make use of relevant keywords and hashtags to increase discoverability.
- Include on screen captions to make your content more captivating and accessible.
- Export your videos in 1080p even if you shoot them in 4K.
- Edit your videos before uploading.
- Upload videos at 1080p with an optimized bitrate to have control over the final quality.
- Use 9:16 Aspect Ratio for the best fit on mobile screens.
- Enable Upload at Highest Quality settings
- Upload your reel between 6-9 AM, 12-2 PM and 6-9 PM.
Follow these tips to ensure high quality video content on Insta. These tips can help you enhance your visibility and attract more viewers.
Why Hashtags & Engagement Help Quality?
Hashtags and engagement are key to content quality using the right hashtags boosts your reach and helps attract the right audience. Just 2–3 relevant hashtags are enough to enhance discoverability. More engagement means better interaction which the Instagram Reels algorithm rewards leading to better visibility and results.
Why Posting at the Right Time Matters?
Uploading content on the right time is also important. The best time to upload reels on Insta is between 6 AM to 9 AM, 12 PM to 2 PM and last 6 PM to 9 PM because people tend to view their phones during these times.
How to Avoid Losing Quality Over Time?
Only uploading high quality visual content is not just enough you also need to keep your audience engaged afterward. Re-uploading your videos is okay, but avoid using copied content. Here is what you can do to re-create the content..
- Re-upload your content with engaging captions.
- Add relevant hashtags and keywords to attract attention.
- Add text and subtitles to make accessible to more and more people.
- Keep your content short and to the point.
- Make your content engaging and impactful.
- Use audios that are in trend.
- Post at the right time.
- Maintain consistency by posting content on a regular basis.
Also Read: Anonymous Instagram Viewer
The Bottom Line
So, these are the steps that you need to take to upload HD reels on Instagram. Following export settings for Instagram reels and implementing video visual quality settings can help you enhance your visibility and attract more and more viewers.
Additionally, we have mentioned a few tips to make your Insta journey as easy as possible. You are advised to follow these tips. Whether you are just beginner or want to enhance your viewership these tips can help you tremendously.
FAQs
Q1. How Many Reels Should I Upload to Grow?
Consistency matters more than just posting a lot to grow Instagram account. Aim to post 4–5 high-quality and trending content each month. Make sure your content is original and engaging Instagram rewards quality and consistency. Pro tip is don’t overpost. Posting too much can lower engagement as viewers may lose interest. Always think from your audience’s perspective.
Q2. What’s The Best Time to Post an Insta Reel?
Early mornings (6AM to 9AM), lunch hours (12PM to 2PM) and evenings (6PM to 9PM) work well. Pick a time that fits your audience and stay consistent with your uploads.
Q3. How Long Does It Take to Have Million Views?
It depends on how consistent you are and how engaging your content is. Hence, make sure you create original, engaging and captivating content to attract viewers’ attention.
Q4. How Can I Reach More People with Insta Reels?
➝ Focus on driving authentic engagement.
➝ Create high quality and Instagram algorithms friendly content.
➝ Focus on video quality to ensure visually appealing content.
➝ Ensure the first three seconds is engaging.
➝ Use trending and popular audio.
➝ Make your content relatable.
➝ Keep tracking your profile’s performance.
➝ Edit your videos using dedicated applications for the best results.
Q5. How Can I Grow My Following on Instagram with Instagram Reels?
The best way to grow on Instagram is by posting engaging Reels regularly. This help you reach more people especially new audiences. Pick a clear niche and plan your content so you can post consistently and keep followers interested.

